
Hai Mươi Sáu Cách Làm Computer Chạy Nhanh Hơn.
Thưa quí bạn dưới đây là 26 cách thay đổi ngay
trong Windows 7 làm computer của các bạn chạy nhanh hơn. Hai mươi
sáu cách nầy tôi chôm trong internet tiếng Anh. Bảng tiếng Anh không
có h́nh hướng dẫn. Với Windows XP và Windows Vista cũng có thể áp
dụng được phần lớn phương cách hướng dẫn trong đây.
H́nh ảnh kèm theo là do tôi “chụp” và ghi chú tiếng Việt để các bạn
dễ thấy, nếu chỉ để tiếng Anh không h́nh th́ các bạn ṃ lâu lắm mà
có khi cũng không t́m ra được v́ Windows 7 khá phức tạp. Nếu các bạn
làm đúng sẽ thấy computer chạy nhanh hơn khá rơ. Thí dụ dễ thấy là
khi click mouse nó đáp ứng nhanh hơn. Lúc trước click mouse xong
computer “tà tà” đáp ứng.
Các bạn không nên in bài nầy ra, như vậy vừa tốn giấy mực mà vừa bất
tiện.
Theo tôi thấy cách hay nhất là mở cái file nầy ra bằng Microsoft
Word, xong bỏ nó ra một phần nhỏ trên màn monitor (thí dụ bên tay
phài). Đọc từ tiết mục một rồi làm theo, như vậy phần hướng dẫn và
cả h́nh ảnh luôn luôn nằm trước mặt. Trước khi bắt đầu xin thưa rằng
các phương thế bày ờ đây an toàn, nhưng trong khi thực hành các bạn
click bậy có khi sẽ đưa tới đâu tôi chịu thua không biết, lở ra
computer sanh chứng lai rai các bạn bắt đền th́ tôi cười trừ. Do vậy
các bạn mới xài computer nên ḍ theo h́nh và làm cẩn thận. Cứ từ từ
làm, thử từ tiết mục một, tất cả đều “reversible”, thấy không ưng ư
trả nó về lại như cũ, đừng sợ lở tay làm “hư bột hư đường”.
Các bạn cũng nên lưu ư là mỗi loại windows đều có kiểu tŕnh bày xê
xít nhau một chút, những h́nh hướng dẫn ở đây lấy từ Windows 7 có
khi không giống như trong computer của các bạn tuy cũng xài Windows
7.
Huỳnh Chiếu Đẳng (23-May-2011)
26 Easy ways to Speed up Windows 7
Windows 7 is engineered for more speed. Special attention has been given by the Windows 7 team for making Windows 7 faster than the previous operating systems. Windows 7 is much faster than Windows Vista but even then most of us don’t get satisfied with it. There are many who still have their old PC. Installing windows 7 on them won’t be as soothing as they work with with XP and even with latest hardware’s installed some users still long for more performance. At least if we don’t make it lightning fast we can optimize Windows 7 to the maximum possible extent and enjoy the maximum performance we could squeeze out from it. So for all the extra performance lovers, we are presenting 26 steps to make your windows 7 more faster.
1. How to Disable the Aero Theme on Windows 7
If you are not an appearance lover but a
performance lover then disable aero experience in windows 7. This
method defiantly affects the performance of Windows 7. You can gain
some physical memory and display card work load for programs by
disabling aero.
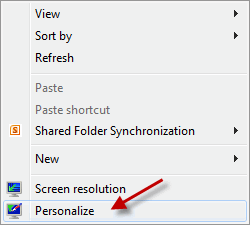
1.1. Right Click on your Desktop and select ” Personalize ” click
the Window Color Tab.
1.2. Uncheck the Box saying ” Enable Transparency ” and then click on ” Open classic appearance properties for more color options”.
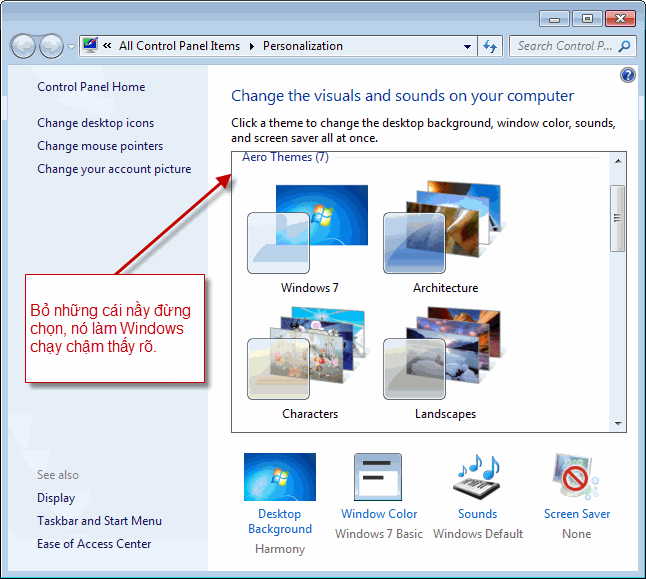
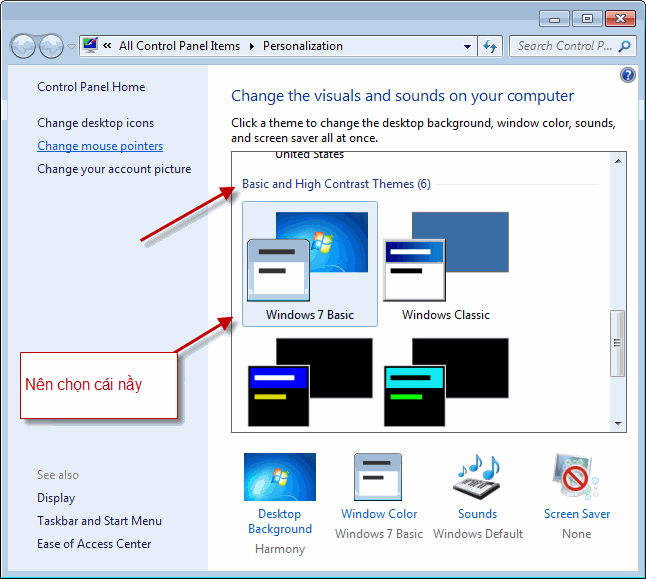
1.3.Then a window will open up. Apply a Standard
or Basic theme from it. The Standard Windows 7 theme is more
preferred.The aero user interface certainly adds some ” Eyecandy ”
to Windows 7 but certainly is a resource hog especially when, what
you expect from windows 7 is more performance juice.
2. How to Disabling the Search Indexing Feature in Windows 7
Most of the Windows 7 users do less searches in
there system. The Search Indexing service in Windows 7 will index
keeps track of the files so that they can be found quickly when
asked at some other time. This feature is useful only if you perform
frequent searches on your system. It unknowingly eats up your system
resources. What you need from windows 7 is maximum performance from
it then i would certainly recommend you to disable this resource
hogging Windows 7 Search Indexing Feature.
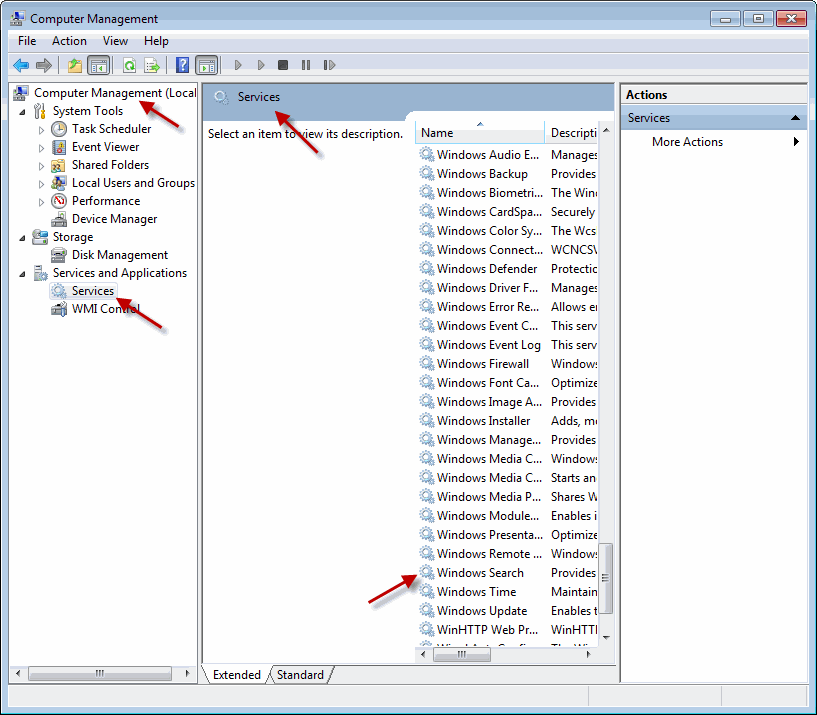
2.1. Right Click the “Computer” Icon in the desktop and select
“Manage”.
2.2. Click “Services and Applications” in the “Computer Management”
window.
2.3. Click on “Services”.
2.4. You can see a lot of services listed there. Look for “Windows
Search” in that.
2.5. Right Click on “Windows Search” from the list and choose
“Properties”.
2.6. The “Windows Search Properties Window” will open up. From
“Startup type” click on the drop down menu and choose “Disabled”.
2.7. Click “Apply” then “OK” and that’s it. The Windows 7 Search
Indexing Feature is now disabled.
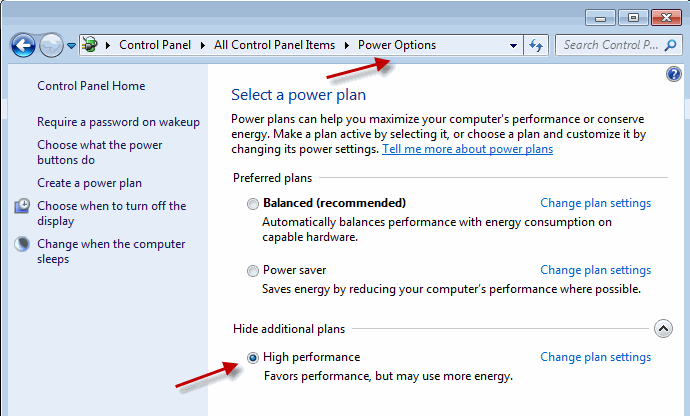
3. Change the Power Plan To Maximum Performance
The Power settings in Windows 7 is not
automatically set for maximum performance. By default the power plan
in Windows 7 is set for a balanced performance with energy
consumption on hardware. So you may not get the optimal performance
from windows 7 if this is the case. So we need to change the power
plan to High Performance Mode.
3.1. Double click the ” Power Options ” in the Control panel.
3.2. Click the down arrow showing ” Show Additional Plans ” to see
the ” High Performance ” power plan.
3.3. Now just activate the ” High Performance ” plan and thats it.
3.4. You may go for the advanced settings for further tweaking if
you want.
4. How to Increase Virtual Memory ( Paging File) in windows 7
Windows 7 consumes more memory than Windows XP
but lesser than Windows Vista. If you are a heavy computer user who
open more programs and windows then you can increase Virtual Memory
of Windows 7. Virtual memory works with physical memory ( RAM). Hard
disk space will be used as virtual memory to keep temporary
information which very rarely use by programs and OS. By increasing
Virtual memory in Windows 7 computer make sure programs and OS work
smoothly.
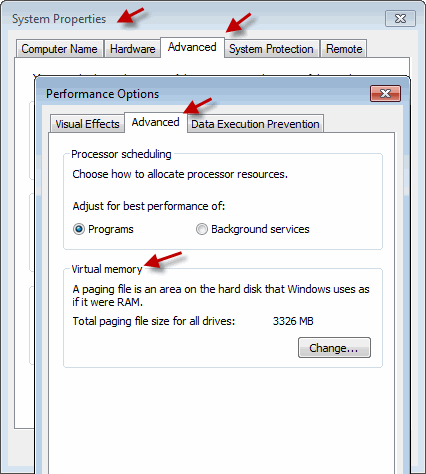
4.1. Right Click on My Computer, select Properties.
4.2. Go to Advanced tab and click on setting button under
‘Performance’.
4.3. Go to Advanced tab in next window, press change button under
virtual memory.
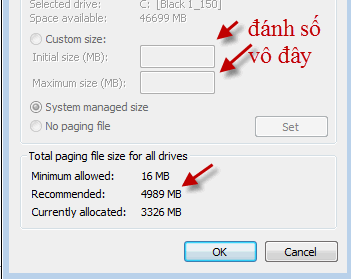
Here you can see the current virtual memory size. Virtual memory
called ‘paging file’ also. In next screen under custom size enter
size you want to allocate for virtual memory (paging file). It
depends on your hard disk size and physical memory. Make sure it’s
not less than system recommended size. Normally recommended paging
file is 1.5 of physical RAM. In this example recommended size of
virtual memory is 4605MB because my windows 7 RAM is 3GB. So, enter
4605MB in Initial size and Maximum Size fields.
Khi các bạn làm tới đây restart computer th́ các bạn sẽ thấy nó chạy
nhanh hơn lúc trước rơ ràng. Trên computer của tôi th́ như vậy, c̣n
trên computer của các bạn th́ c̣n tùy nhiều thứ, nên có khi h́nh xê
xích chút ít, các bạn rán ṃ.
5. How to Disabling the Unwanted Visual Effects in Windows 7 to Speed Up
Again if you are not an appearance lover of
Windows 7 then disable visual effects. It will reduce the load on
RAM and VGA.
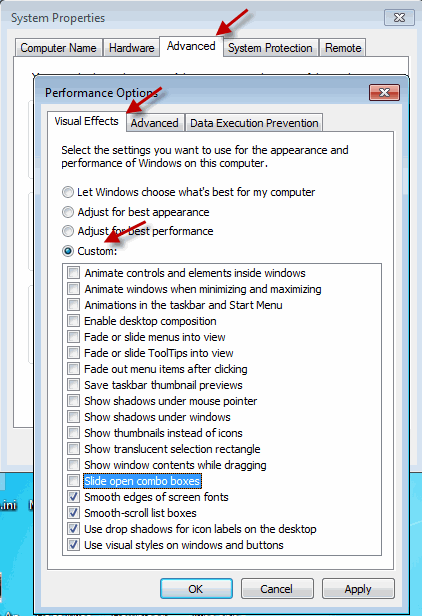
5.1.For this right click on ” Computer” and select “Properties” from
the right click menu.
5.2. Click on ” Advanced System Settings ” from the left pane to
open up the ” System Properties ” window.
5.3. Select the “Advanced” tab from it. Then Under ” Performance ”
click ” Settings “. Choose ” Custom: ” Options From it.
5.4. Now un tick all the options and select only the last four
options (actually three only needed; you can un tick the second
option from the last four).
5.5. Now just logoff your system and turn logon.
6. Disks Defragmentation
Defragmentation helps to improve access time for
each file by managing free space and arranging file locations on
disks. It’s recommended to run defragmentation tool very frequently
especially when you have lot of data. In our case after deleting
unwanted files by disk cleanup in previous step run defragmentation
now.
6.1. Go to Properties of each disk, select defragmentation under
tools and start.
6.2. Defragmentation takes time depends on size of partition and
data.
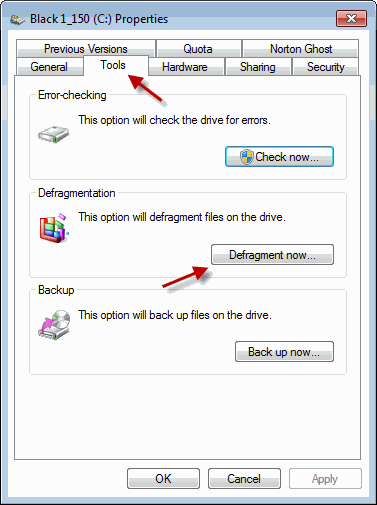
Phần nầy khá dễ ai cũng làm được, nhưng cẩn thận v́ nó mất th́ giờ
nhiều lắm, có khi nhiều tiếng đồng hồ tùy computer nhanh chậm, tùy
hard disk nhanh chậm bao lớn.
7. Sync Centre Synchronization
If any network shares set to sync with your
windows 7 and while it’s happening in background it affects your
system very much. During this time network and disk activity will be
very high and you can’t make it out. Two options are available to
avoid this issue.
7.1. Remove the sync partnership.
7.2. Let synchronization complete fully without any errors.
7.3. Sync Center is located in Control panel.
Không thông dụng nên có thể bỏ qua.
8. Disable the Windows 7 Sidebar
Disabling the window 7 sidebar is definitely help
you to to gain a few seconds during start up time. There are many
useful utilities such as the RocketDock etc. which are good
application launchers.
8.1. Right click on the sidebar and select ” Properties “.
8.2. On the properties windows untick the check box showing ” Start
sidebar when Windows Starts “
8.3. From now on windows sidebar won’t start when windows 7 start
up.
Cái nầy nằm bên tay mặt trên màn ảnh có đồng hồ to và vái thứ linh
tinh khác, thông thường th́ có lẽ các bạn đă disable nó sau khi xài
computer vài tháng v́ thấy không có ích mà chiếm mất một phần màn
ảnh. Nó cũng làm tốn công của computer. Cái sidebar giống tựa như
trong h́nh, thường nó thẳng đứng bên tay mặt màn ảnh. Những ǵ chứa
trong đó thay đổi tùy theo các bạn chọn nên không có tấm ảnh nào
giống tấm nào.

9. Unwanted System Sounds in Windows 7
In order to play the sounds you hear in windows
7, system resources are being utilized. So if you can disable these
sound effects you can gain some speed and also free some system
resources too.
9.1. Type mmsys.cpl in RUN From the Windows 7 Startmenu search box
and press [Enter].
9.2. Navigate to the “Sounds” tab.
9.3. Now from under “Sound Scheme” select “No Sounds” then Click
“Apply” then “OK”.
9.4. You can keep some of your favorite sounds turned on if you
want, but sounds played during the Windows 7 start up, shutdown,
Logon, logoff, start navigation etc should be set to none if you
want some real speed boost.
Không quan trọng lắm, có khi các bạn cần tới nên đừng turn off
sound, có thể bỏ qua
10. Disable the User account control (UAC) Feature in Windows 7
The User account control (UAC) feature in Windows 7 is very annoying
though it says it can protect your computer from harmful virus
activity etc. But if you are a daily user of your computer this
windows 7 feature will be a total nuisance to you.
10.1. From the Control Panel open the ” User Accounts and Family
Safety ” > User Account.
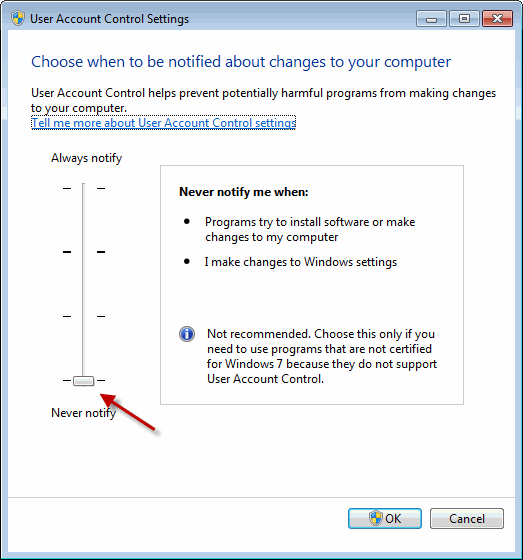
10.2. Click the User Account Control settings link.
10.3. Now just Drag the Slider towards “Never Notify”.
10.4. Click “OK” and Reboot your system.
Cái nầy cần làm đây,mỗi lần run một program là nó nhào ra xét giấy
và hỏi ư kiến bạn coi có cho qua cửa không. Nếu không turn off nó cứ
hỏi các bạn hoài hoài bực lắm
11. Turn OFF Windows 7 Password Protection
If you have set a password for accessing your
user account in windows 7, then you need to enter it each and every
time you logon to windows. Logging into windows automatically
without entering any password will save you a few seconds more. If
you are the only person who use your computer then i would recommend
to turn this off. If that is not the case you can skip this step.
Nên chú ư việc nầy, thường khi các bạn mở computer lên nó hỏi user
name và password rồi windows mới chạy. Theo ư tôi các bạn không nên
set password làm chi. Lư do là mất th́ giờ, lư do khác là một ngày
kia windows khóa cửa bỏ các bạn đứng ngoài sân, vô password nào nó
cũng nói sai hết. Lư do khác là có khi các bạn quên password.
Windows gặp trục trặc th́ password cũng rối loạn. Nếu lở set
password để mở máy computer th́ các bạn nên set lại không có
password cho yên ḷng.
Nếu quí bạn có thơ mèo nhạy cảm cần dấu con mắt bà xă và người khác
th́ tốt hơn là save nó vào flash drive rồi cất đâu đó, đừng có save
nó vào computer. Khi làm như vậy th́ computer các bạn ai xài cũng
được đâu có chi cần dấu đâu.
Nhưng coi chừng những email có h́nh hở hang mà đôi khi bạn bè ưu ái
gởi đến các bạn, dù quí bạn không muốn nhận, nếu ai đó mở computer
lên thấy những h́nh nầy th́ kỳ lắm.
12. Remove IPv6
Remove IPv6 from Windows 7 network adapter
settings if it’s not required. If you are not using IPv6 in internal
or external networks then remove IPv6 to improve Windows 7 network
performance.
Không phổ thông, bỏ qua
13. Turn OFF Windows 7 Screen Saver and Wallpaper
In order to display the wallpapers and screen
saver the system needs some memory. So by disabling those two we can
save a few Mega Bytes of memory.
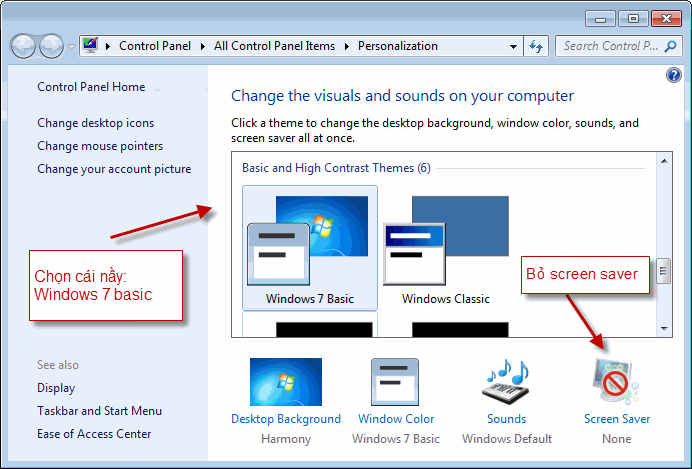
13.1. Right click on desktop and choose “Personalize”.
13.2. Click the Screen Saver link ” From the Screen Saver drop down
menu, Set it to “None” and click “Apply” and then “OK”.
13.3. Now click on “Desktop Background” link.
13.4. From the “Location” drop down menu select “Solid Colors” and
pick one color and click “OK”.
14. Disable the Thumbnail Preview Feature to speed up File browsing in Windows 7
The thumbnail preview feature in Windows 7 will
show the small thumbnails of the contents of a folder instead of
showing it’s icon. But this feature really do take up some system
resources. So by disabling the Thumbnail Preview feature in Windows
7 the file browsing in Windows 7 explorer can be speed up.
14.1. Double Click on ” Computer ” >click on the “Organize”
drop-down menu and select the “Folder and Search options”
14.2. Under ‘Files and Folders’ section, go to the “View” tab and
tick the check box showing “Always show icons, never thumbnails”
checkbox.
Tôi không disable cái nầy v́ cần xem thumbnails tấm ảnh ra sao trước
khi mở nó ra.
15. Turn off Unused Windows 7 Features
There are many feature in windows 7 that we often dont use.
Disabling these unused features in Windows 7 will really help in
speeding things up.
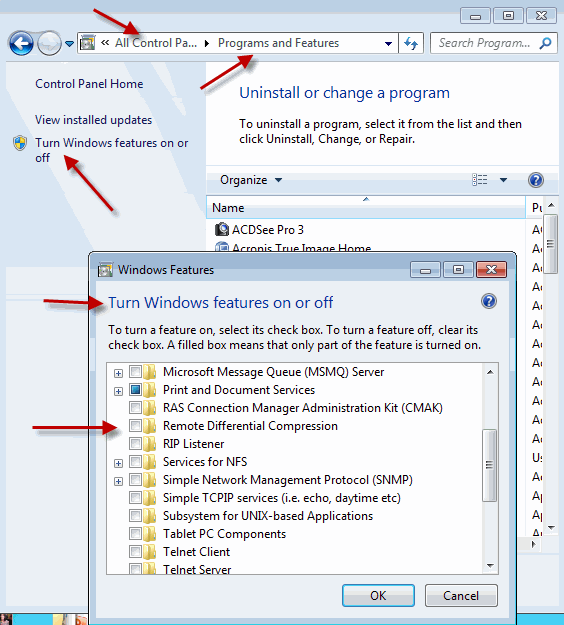
15.1. Open up ” Programs and Features ” from Control Panel.
15.2. Click the ” Turn Windows features on or off ” from the left
pane.
15.3. Now uncheck all the Feature that you don’t use in Windows 7
and restart the system for the changes to take effect.
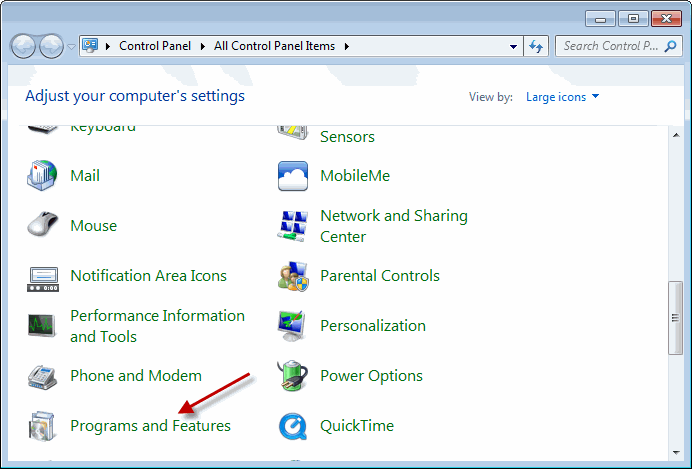
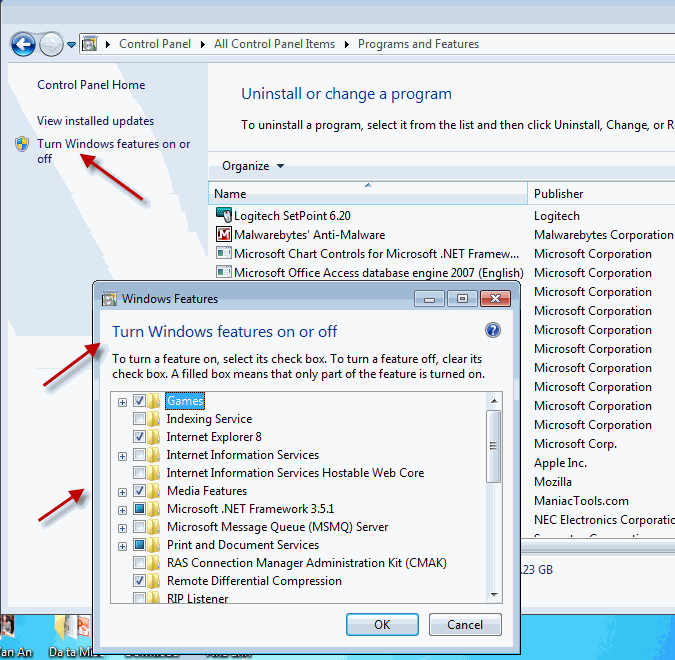
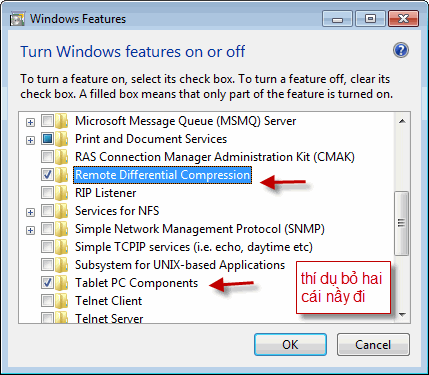
Nếu các bạn thấy chưa dạn tay th́ bỏ qua, từ từ làm sau cũng được.
Thí dụ cái Tablet PC Components các bạn không cần tới khi xài
desktop hay laptop th́ loại nó ra cho rồi. Uncheck xong Windows “làm
việc” mất mấy phút.
16. Disable Unwanted Start Up Items and Speed Up Windows 7 Start Up
This really matters when you have installed a lot
of softwares on your PC. Many software such as AcdSee will run
services such as device detector etc during the system start up.
These are of no use actually for most windows users. So preventing
such services from starting up during the start up of windows 7 can
result in quicker start Ups. This will actually save some seconds
during windows 7 start up.
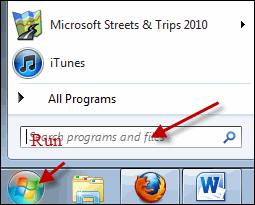
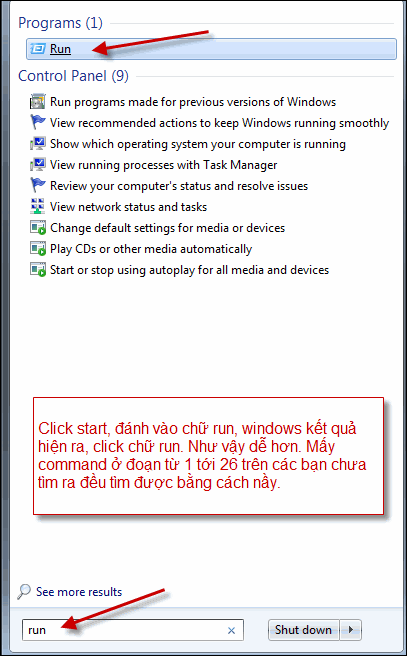
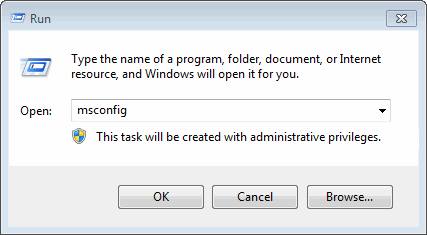
16.1. Type ” msconfig ” in the “RUN” option from start menu press
[Enter] to open up the System Configuration Utility.
16.2. Now navigate to the “StartUp” tab.
16.3. Untick the Entries which are not needed.
Các bạn theo chỉ dẫn trên cũng được hay theo h́nh dưới đây cũng đưa
tới cùng một chỗ
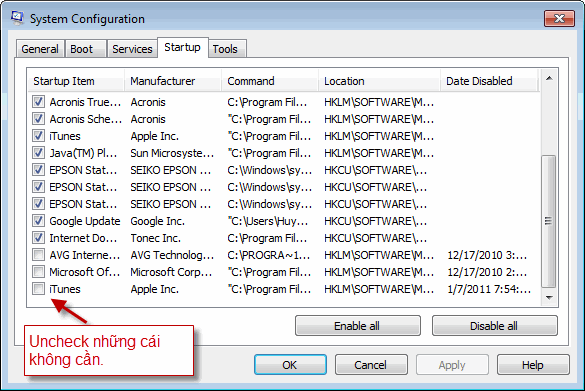
Nhiều computer có một list rất dài, nên coi lại những program nào không dùng un-check bớt. Thử từ từ, nếu thấy máy chạy chưa theo ư muốn th́ mở starup (cách như trên) ra rồi ghi check mark trở lại không sao cả.
17. Disable the Aero Peek and Aero Snap features in Windows 7
17.1. Open the Windows 7 ” Control Panel ” and
double-click on ” Ease of Access Center ” icon.
17.2. Now click on the ” Make it easier to focus on tasks ” seen at
the bottom in there
17.3. Now untick the check box saying ” Prevent windows from being
automatically arranged when moved to the edge of the screen ” .
17.4. Right click on the Windows 7 taskbar and select ” Properties
“.
17.5Now untick the ” Use Aero Peek to preview the desktop ” option
from there.
Aero Snap will help you to maximize, minimize and resize the windows
just by dragging and dropping it into the screen corners.
To disable Aero Snap Feature in Windows 7,
That will now disable the Aero Snap in Windows 7.
Now To Disable the Aero Peek feature in Windows 7
The Aero Peek feature in Windows 7 helps you to peek through all
open windows by hiding all other windows and showing only the
outlines of all windows. Aero Peek is similar to the ” Show Desktop
” Feature in XP and Vista.
If you have followed step 3 then Aero Peek will be automatically
disabled. If not,
The aero peek feature will now be disabled in windows 7.
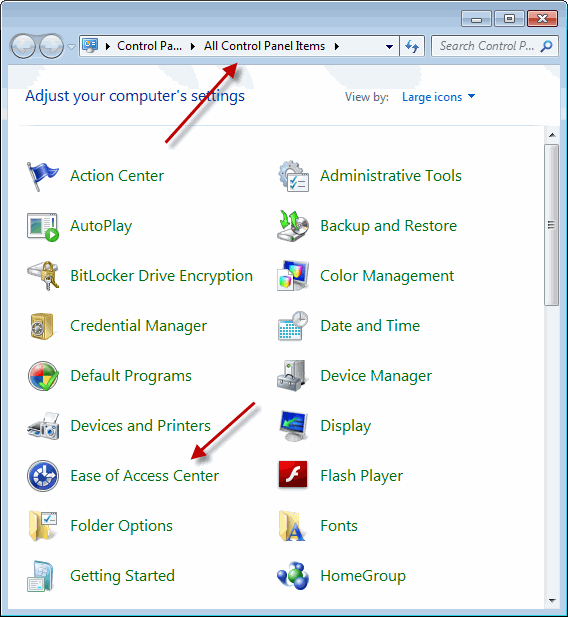
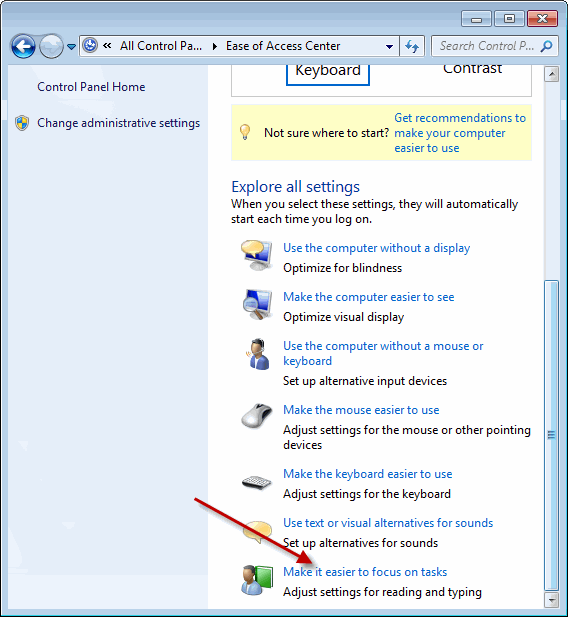
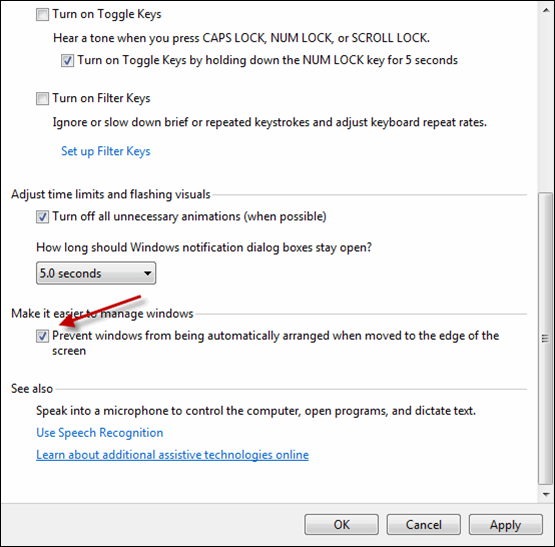
Cái nầy không quan trọng nhiều, khi kéo cái
windows tới góc màn ảnh th́ nó bung lớn chiếm trọn màn ảnh làm mất
th́ giờ sử dụng computer thôi.
18. SetUp the Windows 7 Ready Boost Service for an Extra Speed Boost
18.1. To configure the Ready Boost Feature in
Windows 7 you need to have a High Speed Flash/USB or Pendrive with
you which is ready boost compatible.
18.2. After plugging you pendrive, open “Computer” > Right-click the
on USB Drive/Pendrive > select “Ready Boost” tab > tick the “Use
this device” checkbox.
18.3. You can configure how much space on your USB drive to be used
as Ram.
The ready boost feature in Windows 7 will help you to use your flash
drive or pendrive or USB drive as Ram there by improving the
performance and speed of windows 7 greatly. You can certainly
experience it when launching bulky applications such as adobe
photoshop etc.
Không thông dụng cho mọi người nên bỏ qua
19. Disabling the Unwanted Services to Speed up Windows 7
There are many services in windows 7 that we dont
require for our daily use. There are some exceptional cases though.
Services such as “print spooler” is only needed when we use a
printer. If we use a printer only occasionally we can safely turn
off that service in Windows 7 and turn it on only when we need to
take a print.
Không thông dụng cho mọi người nên bỏ qua
20. Remove RDC to improve Windows 7 Network
This feature introduced with Windows Vista to transfer data over network in compressed format. The same RDC feature continued in Windows 7 also. Since most of the old operating systems came before vista do not support this RDC feature, it slows down network data transfer in windows 7. You can remove this RDC (Remote Differential Compression) in windows 7 by visiting control panel and programs and features. Click on ‘Turn Windows features on or off’, as shown below.
21. Virus check with Microsoft Security Essential
Make sure your windows 7 computer is virus free.
Viruses make any computers slow by giving additional work to
processors, memory and disks. You can run virus check and clean
viruses by free antivirus software ‘Microsoft Security Essential’
from Microsoft. Download Microsoft Security Essential here and run a
scan.
Các bạn dùng bất cứ software antivirus nào cũng được. Coi chừng xài
windows lậu léng phéng vào nhà ông Cổng bị ổng đập xụm bà chè đó.
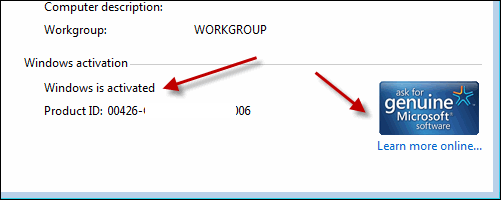
Nếu máy computer của quí bạn có h́nh giống ngay dưới th́ mới nên ṃ
vào Microsoft mà update hay download Microsoft Security Essential dù
ghi là free.
22. Most Essential Softwares To Speed Up Windows 7
In order to maintain your Windows 7 Performance
and keep it up in Top Shape there are some very essential software’s
that can help us to Speed Windows 7. I will list some of them here.
You can download these utilities. But i remind you that you need to
run these utilities at least once in a week. Only if you do it
regularly your Windows 7 will be in top shape every day.
- WinTools .Net
- Wise Registry Cleaner
- CCleaner
- TCP Optimizer
- TeraCopy
- Startup Delayer
Cái Wintools. Net nầy rất hay. Mấy cái kia th́ cố phương tiện thử
cũng được. Tuy nhiên chỉ những cách đứng đầu bài nầy mới có ảnh
hưởng tới vận tốc computer nhiều hơn là những phần gần chót.
23. Windows 7 Disk Clean up
Remove unwanted and temporary files on your
Windows 7 disks. It reduces access time on system and your files to
make Windows 7 faster.
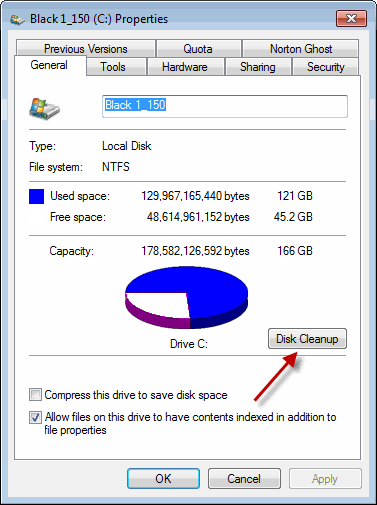
23.1. Right click on each disk, go to properties and press Disk
Cleanup button.
23.2. In next screen you can select file types to delete and start
clean up.
24. Run Error-Checking on disks
This is another method to improve performance of
disk. It will check and correct any system files or physical disk
errors on Windows 7 computer.
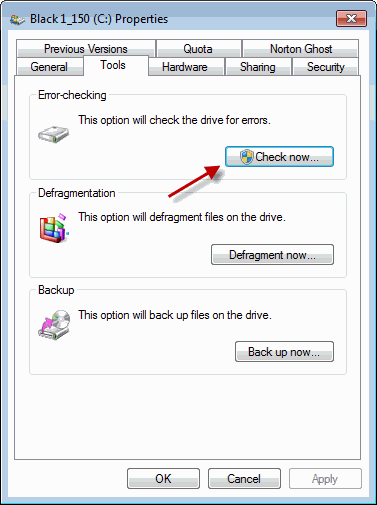
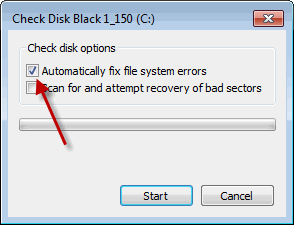
24.1. Select Error-check under tools in each disk with both options
selected.
24.2. If the particular partition is a system, boot or having paging
file then error-checking will start in next boot.
Nếu đó là drive C: th́ Windows sẽ restart computer mới có thể fix
được. C̣n các drive khác không chứ operating system (windows) th́ nó
không cần restart.
25. Disable Windows Defender
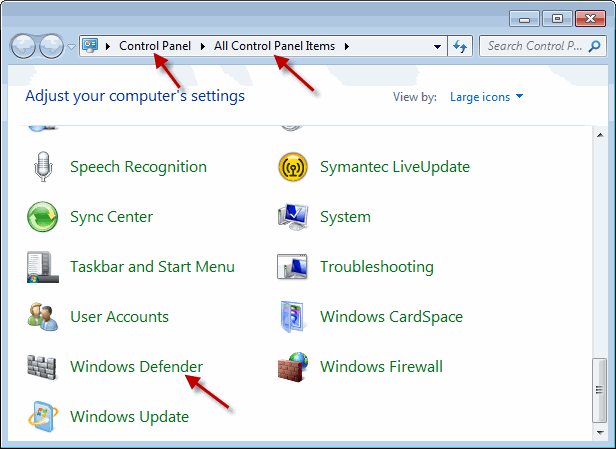
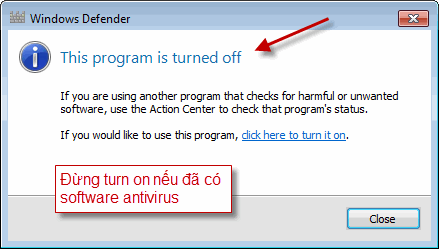
When you use third party protection software such
as Norton, AVG, MacAfee…etc, then disable windows defender. It does
almost the same job. So it’s not required to run two similar
programs in same time which is a unwanted system load for Windows 7.
You can disable Windows defender in control panel.
26. Compatibility of drivers and programs
Before install any drives or programs make sure
it’s compatible with Windows 7. It should be officially supported
for Windows 7. Installing non compatible drivers and programs on
Windows 7 may cause problem with system performance and crash your
system.
Nên download device drive mới nhất của mỗi món hardware mà các bạn
gắn vào computer. Nhớ chọn device drive version mới và đúng cho loại
windows của computer thí dụ cho windows XP, Windows Vista, Windows
7.
Kết luận: Sau khi các bạn làm một số thù thuật trên, các bạn
sẽ thấy windows chạy nhanh hơn, thí dụ dễ thấy là khi click mouse nó
đáp ứng nhanh hơn. Lúc trước click mouse xong đợi một chút nó mới
đáp ứng.
Các bạn cũng nên lưu ư là mỗi loại windows đều có kiểu tŕnh bày xê
xít nhau một chút, những h́nh hướng dẫn ở đây có khi không giống như
trong computer của các bạn.
Những cách làm computer chạy nhanh nơi đây tương đối an toàn, nhưng
nếu các bạn làm sai th́ có chuyện chi tôi chỉ cười trừ, không bảo
đảm cho các bạn đâu nghe.
Cuối cùng câu hỏi của hcd tôi với các bạn không nằm trong nhóm i-tờ
computer rằng (th́ là) tại sao bài nầy chứa một đống h́nh ảnh mà số
bytes của nó nhỏ xíu tuy rằng h́nh vẫn sắc nét. Các bạn phải đọc bản
chánh Microsoft Word mới thấy sắc nét, các bạn đọc qua email chuyển
đi th́ nó mờ hơn. Thông thường các bạn insert vào text vài tấm ảnh
thôi th́ số bytes của cái file tăng lên thấy sợ luôn, chuyển qua
email cả buồi mới đi hết. Đúng không? Bài nầy chiếm khoảng 637KB,
đáng lư với sớ h́nh nhiều như trên th́ nó phải chiếm vài chục MB.
(1MB=1000KB)
HCD (23-May-2011).
KỸ THUẬT
Cách
Set up iPad có thể gọi và nhận phone calls từ iPhone
Gơ tiếng Việt
bằng Telex & VNI trong Windows 10 (11) hay trong iPhone
Setup Facebook
account security khỏi bị thiên hạ đánh cắp
Gơ chữ
Việt bằng Telex & VNI in Windows 10
12 Nút F trên bàn phím
Vài chức
năng mới trong Windows 10
Cách đánh tiếng
Việt trên Google Chrome browser
Cách set up Gmail
mail account chống hack
Cách set up
Yahoo mail account chống hack
Gơ
chữ Việt trong Gmail không cần software...
Thunderbird
Email Client
Gơ chữ Việt trên IOS 7 (Iphone & Ipad)
Cách dùng
Windows System Restore trong Wins 8.x
Kỹ Thuật chụp h́nh:
Xoá phông, làm mờ hậu cảnh (background)
Shutdown icon trong Windows
8.x
Gơ chữ Việt trong
Win 8
Cách làm
Win8 (Enterprise) To Go trong USB portable HDD
Cách tạo h́nh trở
thành pencil drawing bằng Photoshop
Cách dùng
Photoshop để resize nhiều h́nh cùng 1 lúc
Photography
Glossary - Danh từ nhiếp ảnh
Nhiếp ảnh - Kỷ
thuật xóa background
Dùng downloadhelper
add-on trên Firefox browser để lấy video, audio etc...
Cách
đánh tiếng Việt không cần bộ gơ tiếng Việt như VPS,
Unikey...
Cách gơ tiếng Việt
có dấu trong Windows
26 Easy ways to Speed up Windows 7
T́m hiểu GPS
Cách log in vào
Web mail cho vị nào có hơn 1 Gmail accounts.
Dùng Acronis True
Image (ati) để back up và restore...
Cách thức
cài email client trong Gmail
Chuyển clip từ
youtube qua video
Download và cách dùng VPSKeys
để gơ chữ Việt
Multiboot Windows
Cách thức download
tài liệu từ youtube
Internet và an toàn thư Điện
Tử
POP và IMAP
Cách thức enable POP và
IMAP trong Gmail
Cách tạo nhóm địa chỉ
email
6 điều cần biết về Windows
7
7 điều cần biết về Windows 7
Dùng Windows XP để gơ
chữ Việt
Dùng Windows
Vista để gơ chữ Việt
Download file từ
Youtube
Điều chỉnh Browser để đọc
chữ Việt
Gơ chữ Việt
không cần mhu liệu hỗ trợ
Gơ chữ Việt bằng VPS
Gơ chữ Việt bằng WinVN
Gơ và chỉnh chữ Việt bằng
Unikey
Gơ chữ Việt bằng UniKey
Chỉ dẫn gia nhập diễn đàn Bất Khuất
Bảo vệ E-mail Address
book
Máy PC chạy chậm
Tăng tốc độ up/download ...
Nhu liệu play video/audio
Download
VPSKeys 4.3
Unikey 32 bit
64 bit
Adobe acrobat reader
Winzip
WinRAR
TeamViewer
Mozilla Firefox
PowerPoint Viewer